
Google’s Analytics and the “bounce rate” aren’t telling you everything you need to know about your blog’s performance – this is especially true if you’re a small blog with only a few readers. At best, you’ll simply know how many people hit your site, how long they stayed (on average), and whether they navigated to another page on your site before leaving. But this isn’t the full picture! Did they read my article? Did they just skim it, or did they really read it? Are some of my articles getting abandoned halfway through?
There’s a simple way we can boost Google Analytics to give you this great info – we’re going to add Scroll Depth Tracking to your WordPress pages, and this data will automatically report in your Google Analytics data. I’ve done all the hard work for you, so just follow this easy guide and you’ll have this functionality on your WordPress site in about 30 minutes, and for $0. Let’s get started:
Step 1 – Get the required plugin
For this to work, you’ll need Google Analytics for WordPress by Joost de Valk. On a quick side note, I highly recommend following Joost’s blog, and using his plugins whenever possible.
Step 2 – Change your Site Speed Sampling Rate
Your Site Speed Sampling Rate is the percentage of visitors to your site that Google will “time” through the website. Why do we want to change this? First off, the standard setting for this is 1%…meaning if you get 100 visitors to your site every day, you only get timing data for 1% of them…1 person. However, Google allows up to 100,000 per day! So until you hit 100,000 visitors per day, set the sampling rate to 100%. Now you’ll know exactly how fast all your readers are moving through the site.
Changing the Site Speed Sampling Rate is easy. First, go into the Google Analytics for WordPress plugin’s Settings page. Once there, click “Show Advanced Settings”

Next, under that newly-shown “Advanced Settings” section, you’ll see “Custom Code:”….in that section, copy and paste this exact code, including the leading underscore and semicolon at the end:
_gaq.push(['_setSiteSpeedSampleRate', 100]);

Step 3 – Upload the Scroll Depth Tracking Plugin to your site
First, download the Scroll Depth Tracking Plugin. Unzip it. There’s a bunch of files in there, but only one you really need: jquery.scrolldepth.js
Next, we need to get this one file to your site. Using your FTP client (I highly recommend Transmit, by the way), navigate to your public_html directory. In this directory, we’re going to create a folder called “scripts” – all lower case. Next, upload that one file – jquery.scrolldepth.js – to the new /scripts/ directory.
Step 4 – Call the plugin using your footer
This is the last bit of code – I promise. However, this is also the most powerful. I’m going to give you a standard configuration, but if you read up a bit more on this plugin, you’ll be able to tweak it to gain extraordinary data. A word of caution – in this section, we’ll be working with the theme files of your site – perform a backup of your site before proceeding. Also, never delete or change any existing code – we’re only ADDING to the code. In general, you’re safe to add, but can do real damage deleting or changing what’s already there.
In your WordPress control area/back end, click “Appearance” on the left side. Next, click “Editor” at the bottom. On the screen that follows, you’ll see a bunch of links on the right, and a window with code in the center. Look for a link on the right that says “Footer (footer.php)” – click it. We’re going to edit this PHP file. Now, scroll to the bottom – your footer file should close out the <body> tag at the very bottom, like this:
</body>
</html>
…We’re going to add some code right before that. Copy and paste this code exactly, changing only “YOURNAMEHERE” with….your name:
<!-- Added by YOURNAMEHERE -->
<script src="https://ajax.googleapis.com/ajax/libs/jquery/1.7.1/jquery.min.js"></script>
<script src="/scripts/jquery.scrolldepth.js"></script>
<script>
$.scrollDepth();
</script>
….let’s take a quick look at an example from this site:
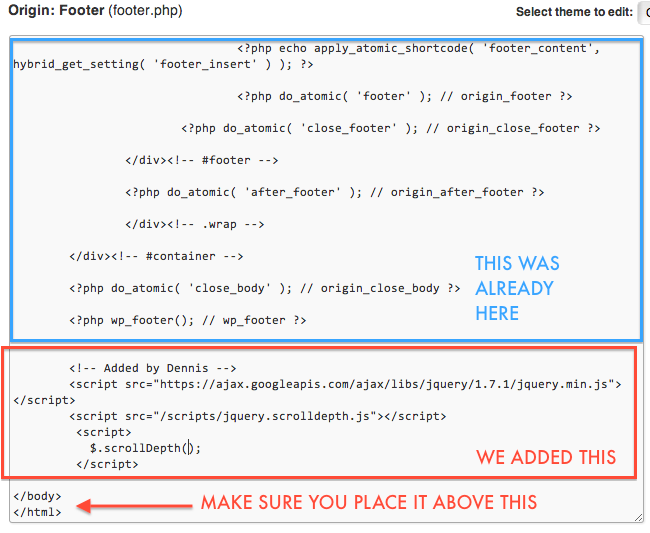
I’m not a huge fan of having people insert code without understanding it – so here’s a quick explanation – the first section “Added by YOURNAME”, is commented out – meaning it’s not read by browsers. It’s there so you remember later that you added that exact block of code. This is a jQuery (javascript) plugin, so all the <script> tags basically call up the plugin. That last section that included “scrollDepth()” is editable – I recommend reading more about the plugin, and finding out how you can improve it for your site. We add all of this before the body is closed out via </body>, because that’s where the code belongs – in the body of the page.
Step 5 – You’re done – look at your results!
Now when you log into Google Anaytics you can view how far your users are scrolling down the page. Go to Content > Events to view this data. You can also view how long it takes them to scroll this far – go to Content > Site Speed > User Timings to see this data. The scroll metrics are expressed as percentages – “Baseline” is the top of the page. 100% means the scrolled all the way to the very bottom.
All credit and thanks for this plugin goes to Rob Flaherty. If you have any problems/questions, please post them in the comments – I’ll do my best to answer them. Also – if you have a great WordPress plugin or hack you’d recommend, put that in the comments too!


This was brilliantly explained. Is there any way to set up scroll tracking so that it excludes the comments section though? Some of my comments sections are over 5 times longer than the actual article – and I don’t really care whether people read them – so is there a way of cutting them out of the tracking domain?
Hi James,
Thanks! There is definitely a way to do this, and it’s really pretty easy. As a more broad reference, you can check out the site for the plugin here: http://robflaherty.github.io/jquery-scrolldepth/ …but I’ll explain how I do it, too.
The plugin can also track scroll depth by Elements – which is something I use. The rule here is, you must specify a unique ID as an element – something that is only going to occur once on a page. It can be an actual ID, a class, etc – just make sure it only occurs once per page, because it needs to be a single event. For my site, for example, I do this:
$.scrollDepth({
elements: [‘.comment-reply-title’]
});
The comment-reply-title class is only called once, and it’s conveniently right before the comments. So, I use the class selector “.”, plus the class name “comment-reply-title”, and we’re set. Now, I’ll get two sets of data: percentage scroll depth, as well as when someone scrolls to that exact place in my page – in this case, the comment reply title.
Hope this made sense, or helped out a bit. The link I provided above is a huge help – I’d definitely recommend giving that a read. Best of luck, James!
Ah okay, so am I right in thinking that this just tells you when somebody reached the comments section – it doesn’t narrow the tracking domain?
Hi James –
Correct – this just says when someone reaches the comments section, or whatever element you specify.
FYI we installed this code and found two things
1. Do not copy and paste the code. Manually type the code. For whatever reason this character ” is different than ” when keyed in manually. We fought with this for 6 hours until we decided to hand code. Perhaps a rookie mistake.
2. The jQuery library called in the footer code conflicts with the current jQuery library being used by WordPress and so our other plugins stopped working. Haven’t found a resolution for this conflict yet.
Thanks again for all the code and tips. Making a huge difference already in tracking visitor activity.
Oh also the “increase timing” hack you offered up kept our code from working also. Forgot to mention this earlier. Unsure the cause, but removing that from Google Analytics plug in “Custom Code” field got us back working again.
Hey Jesse,
With everyone’s WordPress install being different, especially with the ubiquity of plugins, it definitely does get difficult to make a “one size fits all” solution. Maybe one day someone will turn this into an all-in-one, easy to implement plugin….but for now, yeah, it does require a bit of fiddling. Glad you got it to work in the end!